Service definition
In order to deploy a custom service on the DSH, you need to configure its resources and behavior via the service definition:
- The service definition is a JSON document.
- The DSH validates the service definition when you try to start or restart your custom service.
- Using the service definition, you can configure the behavior of the custom service: CPU, memory, environment variables, instances, etc.
- When you edit the service definition in the DSH Console, you can use the dropdown lists at the top to insert existing resources and services from the DSH:
- Volumes
- Vhosts
- Kafka topics (of type “scratch”)
- Secrets
- Object storage buckets
- DBaaS
- Additionally, you can define endpoints where the DSH can collect metrics or tracing, and check the health of your custom service.
- In the editor, you can view the service definition in the code view (compact or expanded), or in the tree view. You can also undo and redo actions.
Default keys
If you create a new custom service, then the service definition contains a set of default keys and values. The sections below describe each of these keys.
Name
The name key refers to the name that you first entered when you created the custom service from the DSH Console. The value is a string that needs to comply with the following requirements:
- Only use lowercase letters (a–z), numbers (0–9), and hyphens (
-). - The name can’t be longer than 45 characters.
- The name can’t end in a dash (
-).
Container image
The image key refers to the location of the container image in the DSH’s Harbor container image registry. The value is a string, and you should take the following into account:
- The DSH only allows container images from its own Harbor container registry.
- The container image must comply with several requirements. See Requirements of container image for more information.
- Typically, the value of the
imagekey has the formatregistry.cp.kpn-dsh.com/<tenant>/<container-name>:<version>.
The DSH runs custom services with an imagePullPolicy of Always:
- Whenever the DSH starts an instance, it downloads the image that you specify in the service definition from the Harbor repository.
- This can happen when your restart or scale the custom service, when it crashes and restarts, or during an update of the platform.
- The DSH downloads the image only when it starts an instance, and not at another time. If you deploy a custom service with the tag
:1.0and then push an update with that same tag, then this won’t initiate an automatic restart of the instances.
CPU
The cpus key refers to the number of CPU cores that you allocate to your custom service. The value is a number, with 0.1 cores as the default value. You should take the following into account:
- The maximum value depends on your platform. 3.2 cores CPU is a common maximum value across platforms, but contact your platform administrator for more specific information.
- When you deploy your custom service, the DSH checks the number of allocated CPUs against the CPU limit. The DSH only deploys the service if that doesn’t exceed the limit. See CPU limits for more information.
- Once your custom service is up and running, the DSH guarantees that it has access to the amount of allocated CPU that you defined in the service definition.
- However, the DSH does allow your custom service to spike above the number of allocated CPU cores if enough CPU is available on the node. In other words: the DSH distributes the excess capacity of CPU on a node across all services, while guaranteeing that each service and allocation receives its amount of allocated CPU as a minimum.
Note
If your tenant is close to the CPU limit, then you could experience issues if there is an overlap between the termination and start of your services. For example:
- Your tenant is close to its CPU limit (for example 4.8/5 cores).
- To free resources, you stop a service with a CPU allocation of 0.5 cores.
- The console now shows these 0.5 cores as being available (4.3/5 cores).
- However, a new service of 0.5 cores CPU is still blocked while the old service is terminating.
You can prevent this scenario by making sure that your custom service is responsive to termination signals from the DSH. See Termination signals for more information.
Tip
See CPU for more information about this resource.
Memory
The mem key refers to the amount of memory, in megabyte (MB), that you allocate to your custom service. The value is an integer, with 256 MB as the default value. You should take the following into account:
- The minimum value is 8 MB.
- The maximum value depends on your platform. 12 800 MB of memory is a common maximum value across platforms, but contact your platform administrator for more specific information.
- When you deploy your custom service, the DSH checks the amount of allocated memory against the memory limit. The DSH only deploys the service if that doesn’t exceed the limit. See Memory limits for more information.
- Once your service is up and running, the DSH doesn’t allow it to exceed the amount of memory in the service definition. If it does exceed this amount, then the DSH restarts the service.
Tip
See Memory for more information about this resource.
Environment variables
The env key refers to environment variables that you can inject into your custom service. The value is an object, consisting of key-value pairs:
- Inside the object, each key-value pair represents the name of the variable in your custom service, and the corresponding value respectively.
- By default, the service definition contains the key-value pair
"KEY": "VALUE". - You can define your own custom variables. A valid environment variable name can only contain alphabetic characters (a–z, A–Z), digits (0–9), underscore (
_), hyphen (-), or period (.). Names can’t start with a digit or with... - Additionally, you can add a predefined DSH environment variable to the service definition, using the
{ variables(…) }expression. You can add the following variables using this method:DSH_ENVIRONMENT: The name of the DSH platformDSH_KAFKA_BOOTSTRAP_SERVERS: A comma-separated list of Kafka brokers that a Kafka client can use as a starting point to connect to the DSH’s Kafka clusterDSH_RELEASE: The version of the DSH platformDSH_TENANT: The name of the service’s tenant
Tip
If you need to inject sensitive information into your custom service, it’s recommended to inject it as a DSH secret. See Secrets for more information.
By default, the DSH injects the following environment variables into your container:
| Environment variable | Description |
|---|---|
DSH_CONTAINER_DNS_NAME |
The internal fully qualified domain name (FQDN) of your custom service on the DSH. The FQDN has the format |
DSH_CONTAINER_DNS_SUFFIX |
The common DNS suffix for all internal FQDNs of services of your tenant. The full FQDN has the format |
DSH_KAFKA_CONFIG_ENDPOINT |
The URL of the DSH's Public Key Infrastructure (PKI) service, where your custom service can request the client certificate to connect to the Kafka cluster. |
DSH_TRACING_ENDPOINT |
The endpoint for sending OpenTelemetry traces and metrics to the DSH. See Tracing for more information. |
KUBERNETES_* |
Kubernetes environment variables related to the service. See Service environment variables for more information. |
MESOS_CONTAINER_NAME |
The name of the container on the DSH. It has the format |
MESOS_TASK_ID |
The ID of the container on the DSH. It has the format |
Your custom service may have access to other environment variables depending on the available services for your tenant, such as Grafana or Kafka.
Deprecated
The folllowing environment variables are deprecated and are only injected for backward compatibility. If your custom service still uses these variables, then it’s strongly recommended to replace them:
KAFKA_CONFIG_HOST: UseDSH_KAFKA_CONFIG_ENDPOINTinsteadMARATHON_APP_DOCKER_IMAGE,MARATHON_APP_ID,MARATHON_APP_RESOURCE_CPUS,MARATHON_APP_RESOURCE_MEM
Instances
On the DSH, you can specify the number of instances that your custom service needs to run on. An instance of your service in the DSH corresponds to a pod in Kubernetes. You can define the behavior of the different instances using the instances, spreadGroup and singleInstance keys.
Number of instances
The instances key refers to the number of instances that your custom service runs on. The value is an integer, with 1 instance as the default value:
- Scaling your custom service to multiple instances leads to higher availability: if one instance fails, another instance can take over.
- If a service has multiple instances, then it has multiple pods in Kubernetes.
- The DSH adds a single Kubernetes Pod Disruption Budget for all the pods in that service.
- The Pod Disruption Budget specifies that only 1 pod can be unavailable at the time.
- You can prevent multiple instances from running simultaneously with the
singleInstancekey, see Single instance for more information. - You can use the
spreadGroupkey for the high availability of instances in separate custom services. See Spread groups for more information.
The number of instances is important if your custom service uses a volume:
- A volume can be attached to one running instance only.
- As a consequence, you can’t use multiple instances and a volume without setting the
singleInstancekey totrue. See Single instance for more information.
Note
The Pod Disruption Budget has the following properties:
maxUnavailable: 1unhealthyPodEvictionPolicy:AlwaysAllow
See Specifying a Disruption Budget for your Application in the Kubernetes documentation for more information about these parameters, and how they influence the behavior of your service.
Spread groups
The spreadGroup key allows you to schedule instances of different custom services on different nodes. The value is a string:
- You can specify the same spreadGroup name for different services.
- Kubernetes schedules the pods for these services on different nodes.
- The DSH adds 1 single Pod Disruption Budget for all the pods in that spreadGroup. As a consequence, only 1 pod at the time can be unavailable in that spreadGroup.
- The DSH also creates a Kubernetes service that contains all the pods in the spreadGroup. If you create the spreadGroup ‘test’ in the tenant ‘dshdemo’, then you can access all the pods in that spreadGroup via the internal hostname
spreadgroup-test.dshdemo-default.
Note
The Pod Disruption Budget has the following properties:
maxUnavailable: 10%unhealthyPodEvictionPolicy:AlwaysAllow
See Specifying a Disruption Budget for your Application in the Kubernetes documentation for more information about these parameters, and how they influence the behavior of your services.
Using a spreadGroup has some advantages:
- It allows you to mimic the behavior of a Kubernetes StatefulSet.
- Kubernetes schedules the pods on different nodes, which may match your needs.
- You can create multiple DSH services with a volume that all belong to the same spreadGroup. You can logically use them as 1 single service, with 1 internal hostname that is only accessible to your tenant.
Warning
A spreadGroup can contain a maximum of 5 instances:
- The DSH counts all instances across services that have the same spreadGroup.
- This approach generally assumes that a service contains 1 instance if you specify a spreadGroup for it.
- As a result, you can specify a spreadGroup for 5 services if they contain only 1 instance each.
The name of a spreadGroup must follow the rules below:
- It can contain a maximum of 16 characters.
- It can only contain lowercase alphabetic characters (a–z) or numbers (0–9).
Single instance
The singleInstance key allows you to specify that the DSH should never run more instances than the number specified in the instances key. The value is a Boolean, with false as the default value:
- The key defines how your custom service restarts. This behavior only applies to a user-initiated restart/upgrade of the service. During a platform rollout or an interruption from the cloud provider, an instance of the custom service could be terminated to schedule it on a new node, irrespective of the value of the
singleInstancekey. -
If you set the value to
false, then the DSH follows the strategy below:- Spin up a new instance of the service, concurrent with the existing instances.
- Wait until this new instance is healthy.
- Terminate the old instance.
This strategy ensures that there is no downtime for your custom service during user-initiated restarts.
-
If you set the value to
true, then the DSH follows the strategy below:- Terminate the current instance of the service.
- Spin up a new instance of the service.
While this incurs a (short) downtime for your custom service, it allows for the use of volumes by your service, because they can only be used by one instance at the time.
Note
Be careful when you change the value and restart the service, because errors may lead to unexpected behavior:
falsetrue: The DSH kills the old instances, and the new instance fails to spin up if it contains errors.truefalse: The old instances keep running, and the new instance fails to spin up if it contains errors.
The table below displays the expected behavior of your custom service with different values of the instances and singleInstance keys, and whether this behavior supports the use of volumes:
singleInstance |
instances |
User-initiated restart | Platform upgrade | Supports volumes |
|---|---|---|---|---|
true |
1 |
|
|
Yes |
false |
1 |
|
|
No |
true |
2 |
For every instance:
|
For every instance:
|
No |
false |
2 |
For every instance:
|
|
No |
Kafka token
The needsToken key indicates that the custom service needs a token to request a TLS client certificate that grants access to the Kafka cluster. The value is a Boolean, with true as the default value:
- The custom service can request a certicate from the DSH’s Public Key Infrastructure (PKI) service. Its URL is injected into the service by default and is available in the
DSH_KAFKA_CONFIG_ENDPOINTenvironment variable. - If this key’s value is
true, then 2 environment variables become available in the custom service:DSH_SECRET_TOKEN: This variable contains the token to request a client certificate.DSH_CA_CERTIFICATE: This variable contains the PEM-encoded Certificate Authority (CA) certificate. If your service needs to communicate with Kafka over TLS, then it can use the CA certificate in this environment variable to verify Kafka’s server certificate.
User
The user key refers to the user ID of your tenant. The value is a string in the format nnnn:nnnn, for example 2010:2010:
- The value must be identical to the user ID of your tenant. You can find it by clicking “Resources” > “Overview” in the menu bar of the Console, and then checking “User IDs” on that page.
- For security reasons, the DSH requires that you use your tenant’s user ID inside all containers. In other words, the user ID in the service definition must be identical to the user ID in your containers.
- The service definition contains your tenant’s user ID by default.
Resources
You can add existing resources to the service definition. When the DSH deploys the custom service, then it also gives your service access to the resources:
- You can add the resources using the syntax from the examples below.
- You can also add the resources by clicking one of the drop-down lists above the editor of the service definition, under “Insert”. Once you click a resource, the editor adds it to the service definition.
Volumes
A volume provides your custom service with persistent storage, strictly tied to your service:
- The root volume of every container has a limit of 1 GiB, and you should only use it for temporary storage purposes. See Requirements of container image for more information.
- You can see a volume as an extra disk that you can attach to your service.
- You need to create a volume on the DSH before you can add it to the service definition. See Adding a volume for more information.
Note
The DSH deviates from Docker when mounting a volume over existing data. If you mount a volume into a directory in the container that already contains files and directories, then the mount always obscures these pre-existing files.
Configuration
You can’t share a volume across multiple instances. As a consequence, you need to make sure that you configure the service definition as follows:
This will make sure that the volume remains attached to one instance only, irrespective of platform updates or user-initiated restarts. See Single instance for more information.
Example
If you insert a volume in the service definition, then it has the following format:
The format snippet contains the following placeholders and expressions:
<correct-path>: The path in your container where the volume will be availablevolume(): A DSH expression that accepts the name of the volume<correct-volume-name>: The name of the volume in the DSH
Vhosts
If you add a vhost to the service definition, then it’s possible to reach your custom service from the public Internet:
- A vhost lets you expose an HTTP port on a DNS name that can be reached publicly.
- You can add a maximum of 10 exposed ports to a service definition.
- If you don’t define a vhost for the port, then the DSH does expose the port, but you can’t reach it via the public Internet.
- You can only expose plain HTTP services over a vhost. The DSH doesn’t support TCP or UDP services.
- You need to create a vhost on the DSH before you can add it to the service definition. See Adding a vhost for more information.
-
The DSH supports different methods of authentication:
- HTTP basic authentication
- Forward authentication
- Tenant authentication
See Authentication methods for more information.
Configuration
The exposedPorts key in the service definition refers to the ports that the DSH exposes for the custom service. Its value is an object of key-value pairs, where the key is the number of the port, and the value is an object that represents the properties of that exposed port:
- If you don’t set a port for your service, then the DSH exposes the HTTP(S) ports 80 and 443 by default.
- If you do define ports in the
exposedPortskey, then the DSH exposes these ports only. In other words, the DSH replaces the default ports 80 and 443 with the ports that you specify in the service definition. - If you don’t specify a vhost for a port, then the DSH exposes this port to your other services on the DSH, but blocks access to this port from the public Internet.
These are the properties that you can set:
| Key | Description |
|---|---|
vhost |
|
auth |
|
mode |
By default, the DSH uses the automatically generated ACME certificate from Let’s Encrypt for TLS. Some rules apply on which hosts this takes effect. See details in the certificate documentation for more information.
|
whitelist |
|
paths |
|
serviceGroup |
|
Authentication methods
The auth key for exposed ports supports 3 authentication methods:
- HTTP basic authentication
- Forward authentication
- Tenant authentication
The sections below describe the authentication methods.
HTTP basic authentication
This method is the simple basic authentication as defined in the HTTP specification:
- See RFC 7617 for more information.
- The DSH currently supports a single username-password pair only. As a consequence, you can define one user only for your custom service.
Use the following format for the key-value pair if you want to use HTTP basic authentication:
<realm>: The protection space, which determines the domain over which credentials can be automatically applied. See Protection Space (Realm) in RFC 7235 for more information.<username>: The username for the credentials. The username can’t contain a colon (:), because it’s the separator between the username and the password.<password-hash>: You create this by applying the MD5-based BSD password algorithm 1 to the plain-text password.
On Linux and Mac, you can hash the password using the command below:
# How to hash the password using MD5-based BSD password algorithm 1 (on Linux or MacOS)
> openssl passwd -1 -salt "OKgLCmVl" "my_password_string"
$1$OKgLCmVl$WgV.1J4TqT44f5dBcPquz.
Deprecated
For backward compatibility, the DSH supports 3 other formats for setting the method to basic authentication. However, these are deprecated and it’s strongly recommended to replace them with format presented above.
"auth": "basic-auth@<username>:<password-hash>"auth": "<username>:<password-hash>""auth": "<realm>:<username>:<password-hash>"
Forward authentication
In this method, the DSH forwards any incoming request for the vhost to an authentication service that you run yourself on the DSH.
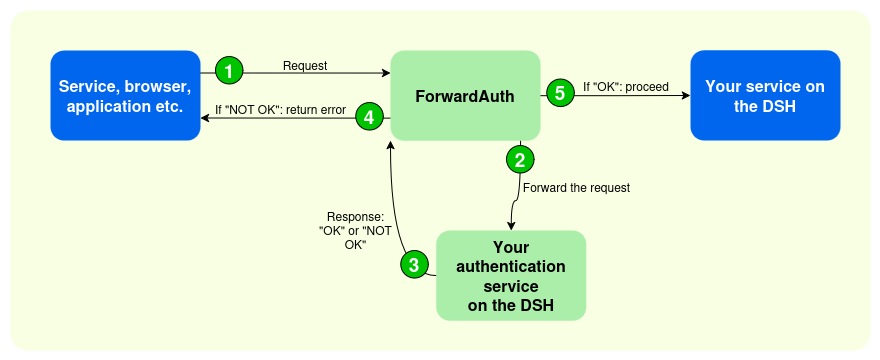
- A service (or browser, application, etc.) sends a request to your service on the DSH.
- The ForwardAuth middleware forwards the request to your authentication service on the DSH.
- Your authentication service responds with
2XX(“OK”), or any other code (“NOT OK”). - If the response is “NOT OK”, the ForwardAuth middleware returns the error.
- If the response is “OK”, then the ForwardAuth middleware forwards the original request to your service on the DSH.
Use the following format for the key-value pair if you want to use forward authentication:
<auth-service-endpoint>:- The name of the service you’re running in your tenant (including scheme, path, port, query string) as your authentication server, to which the DSH must forward all incoming requests. For example:
http://my-auth-service:4181/path?q=q. - The DSH will rewrite the “host” part of the endpoint to enforce that it points to the internal DNS name for your service.
- For example, for the
http://my-auth-service:1234/path?q=qendpoint, the DSH will forward all requests tohttp://my-auth-service.<tenant-name>.svc.cluster.local:1234/path?q=q.
- The name of the service you’re running in your tenant (including scheme, path, port, query string) as your authentication server, to which the DSH must forward all incoming requests. For example:
<auth-response-headers>: When the authentication request succeeds, then your authentication service may include these headers in its response, which is forwarded to your actual service. This is an implementation of theauthResponseHeadersoption, see its documentation on the traefik ForwardAuth page for more information.
Using the examples above, the value of the auth key could have the following form if you want to use forward authentication:
Tenant authentication
In this method, the DSH grants access to the users that have access to the DSH Console for your tenant:
- Your custom service is subscribed to the tenant Single Sign-On system that governs access to the DSH Console and Tracing UI.
- Any user that has the necessary credentials to access the DSH Console for your tenant, can also access the custom service.
- If you use tenant authentication, then the platform’s response to your service includes a header
X-Forwarded-Roles, which represents the user’s roles on the platform. You can use these roles to apply user authorization inside your service.
Use the following format for the key-value pair if you want to use tenant authentication:
<accepted-roles> is a comma-separated list of roles that can access to the service. The following roles are currently defined:
viewgrants “Read” access to the Consolemanagegrants “Read/Write” access to the Console
For example:
"auth": "system-fwd-auth@manage": Only users that have “Read/Write” access to the Console can access the custom service."auth": "system-fwd-auth@view,manage": Users that have “Read” access and users that have “Read/Write” access to the Console can access the custom service.
Example
If you insert a vhost in the service definition, then it has the following format:
{
  …
  "exposedPorts": {
      "1880": {
          "vhost": "{ vhost('your-vhost-name' }",
          "auth": "basic-auth@app-realm:admin:$1$EZsDrd93$7g2osLFOay4.TzDgGo9bF/",
          "mode": "http",
          "whitelist": "56.59.120.23",
          "paths": [
              { "prefix": "/abc" },
              { "prefix": "/def/ghe" }
          ],
          "serviceGroup": "traffic-analysis"
      },
      "8080": {
          "vhost": "{ vhost('another-vhost-name') }"
      },
      "7800": {
          "vhost": "undefined"
      }
  }
  …
}
See the sections above for an overview of the possible values for each key.
Kafka topics
If you add a Kafka topic of type “scratch” to the service definition, then you ensure that the topic is available on the DSH when you deploy your custom service:
- You need to create a Kafka topic of type “scratch” on the DSH before you can add it to the service definition. See Adding a topic for more information.
- If a Kafka topic of type “scratch” appears in the service definition of a custom service, then you can’t deploy the service if the Kafka topic is missing on the DSH.
- You also receive an error if you try to delete a Kafka topic of type “scratch” that appears in the service definition of a custom service. The DSH won’t remove the topic until you delete the service in question.
Secrets
If you add a secret to the service definition, then the DSH injects the secret into the custom service as an environment variable when it deploys the service:
- You need to create a secret in the DSH before you can add it to the service definition. See Adding a secret for more information.
- Add the secret to the service definition via the “Insert” tab. No further configuration is required, but you can edit the value of the
envkey to change the name of the variable.
Object storage buckets
If you add an object storage bucket to the service definition, then the custom service can access the object storage bucket in question:
- You need to create an object storage bucket in the DSH before you can add it to the service definition. See Adding a bucket for more information.
- Add the bucket to the service definition via the “Insert” tab. The DSH then adds the following to the service definition:
- An environment variable in the
envkey, with the name of the bucket. No further configuration is required, but you can edit the key of the environment variable to change its name. - Secrets in the
secretskey, with the access credentials of the bucket. No further configuration is required, but you can edit the value of theenvkey in a secret to change the name of the variable.
- An environment variable in the
- You can add both your own buckets and third-party buckets (owned by another tenant) to the service definition.
- If you add a bucket with access credentials to the service definition, then the DSH asks you to select the correct set of credentials. That way, you can give a custom service only “Read” or “Write” access to a bucket. See Sharing a bucket for more information.
{
  …
  "env": {
      "DSH-BUCKET-NAME": "{ bucket_name('traffic-analysis-bucket') }"
  },
  …
  "secrets":[
      {
          "name": "system/objectstore/access_key_id",
          "injections":[
              {
                  "env": "SYSTEM_OBJECTSTORE_ACCESS_KEY_ID"
              }
          ]
      },
      {
          "name": "system/objectstore/secret_access_key",
          "injections":[
              {
                  "env": "SYSTEM_OBJECTSTORE_SECRET_ACCESS_KEY"
              }
          ]
      }
  ]
  …
}
Services
You can add existing services to the service definition. When the DSH deploys the custom service, then it also gives your custom service access to these services.
DBaaS
If you add a Database as a Service (DBaaS) to the service definition, then the custom service can access the DBaaS in question.
- You need to deploy a DBaaS in the DSH before you can add it to the service definition. See Deploying a DBaaS for more information.
- Add the DBaaS to the service definition via the “Insert” tab. The DSH then adds the following to the service definition:
- Environment variables in the
envkey with the hostname, database ID, and username for the DBaaS. No further configuration is required, but you can edit the keys of the environment variables to change its name. - A secrets in the
secretskey, with the password of the database. No further configuration is required, but you can edit the value of theenvkey in a secret to change the name of the variable.
- Environment variables in the
Metrics
The DSH contains services to track the behavior, health and performance of your custom service:
- The DSH uses Prometheus to collect metrics. By default, it uses Grafana to analyze and visualize the metrics, and to create alerts. See Metrics and monitoring for more information.
- In order to make the metrics available to the DSH, your custom service needs to expose them. You can do so by specifying the path and the port in the service definition.
- The metrics endpoint of your custom service needs to comply with Prometheus’ exposition formats. See Adding metrics to your code for more information.
Tracing
The DSH contains services to track the path of requests or messages throughout the platform:
- The DSH supports OpenTelemetry standard protocols that tenant services can use to send their traces.
- You can add the tracing instrumentation to your code using OpenTelemetry APIs and SDKs. The DSH includes Jaeger UI to inspect the collected traces. See Tracing for more information.
- You need to add the correct tracing endpoint and protocol to the service definition of your custom services for the DSH to collect the traces.
- The DSH always injects OpenTelemetry’s
OTEL_SERVICE_NAMEenvironment variable into your custom service with value set to<tenant-name>.<service-name>.
Tip
The tracing endpoint only exposes the metrics intended for tracing. See Metrics and Metrics and monitoring for more information about exposing other metrics.
Health check
The DSH can perform a health check on your custom service, which is strongly recommended. The DSH checks an endpoint of your custom service for liveness and readiness:
- The check for liveness commences 5 minutes after your custom service starts:
- The DSH checks the endpoint of your custom service every 30 seconds.
- The check fails if the HTTP response isn’t in the “200” or “300” range, or if the request to the endpoint times out after 10 seconds.
- The DSH restarts your service if the check fails more than 3 times in a row.
- The check for readiness ensures that your custom service is ready to receive network traffic after startup:
- The DSH checks the endpoint of your custom service every 30 seconds.
- Your custom service only starts receiving traffic if the HTTP response is in the “200” or “300” range.
Tip
See Liveness probe and Readiness probe in the Kubernetes documentation for more information about these concepts.
In order to activate the health check, you need to add the path and the port of the endpoint for the health check to the service definition: