Kafka Proxy
You can add a proxy server to your tenant to give external Kafka clients access to your DSH streams and private Kafka topics (of type “scratch”):
- By default, the DSH limits access to DSH streams and private Kafka topics (of type “scratch”):
- Only your own tenant can access a private Kafka topic (of type “scratch”).
- Only tenants on your DSH platform can access an internal DSH stream, if they have the correct permissions.
- Only tenants on your DSH platform can access a public DSH stream, if they have the correct permissions. Additionally, you can expose messages in the public stream via the Messaging API.
- The Kafka Proxy allows you to expose DSH streams and private Kafka topics (of type “scratch”) to Kafka clients outside your DSH platform:
- The Kafka Proxy mirrors the brokers in your platform’s Kafka cluster.
- The Kafka Proxy and the external client use mutual Transport Layer Security (mTLS) to authenticate, and to encrypt the connection.
- You can create additional validation rules that the Kafka Proxy needs to check when it verifies the client certificate.
- The Kafka Proxy rewrites the requests from external Kafka clients, and forwards them to the brokers in the platform’s Kafka cluster.
- By default, the Kafka Proxy exposes all private Kafka topics (of type “scratch”) and DSH streams that your tenant has access to.
- Optionally, you can expose your tenant’s Schema Store via the Kafka Proxy.
- Via the Tenant Management API, you can impose additional restrictions:
- First, you need to request a new limit for the Kafka ACL Groups from a platform administrator. See Limits on the Kafka ACL Groups page for more information.
- You can activate the use of ACL Groups in your Kafka Proxy.
- You can create ACL Groups, which contain an array of writable Kafka topics (of type “scratch”) and DSH streams, and an array of readable Kafka topics (of type “scratch”) and DSH streams.
- If you activated the “ACL Groups” mechanism and created ACL groups, then a Kafka client can only gain access to private topics and DSH streams if it uses the correct ID of an ACL Group in the “OU” field of its client certificate.
- The permissions of the external Kafka client are the intersection of the tenant’s permissions, and the permissions in the ACL Group.
Note
Exposing Kafka topics of type “scratch” and DSH streams via a Kafka Proxy matches other use cases than exposing them via the Messaging API:
- You can use the Messaging API for public DSH streams only.
- The Messaging API is the most efficient in a publication/subscription model that involves many external clients, and transmitting small amounts of data at a time.
- The Kafka Proxy is the most efficient in a model that involves few external Kafka clients, and transmitting large amounts of data at a time.
Architecture
This section describes the architecture for the basic setup of the Kafka Proxy, and for the setup involving ACL Groups.
Basic setup
If an external Kafka client connects to a Kafka Proxy in your tenant, then it follows the high-level flow below:
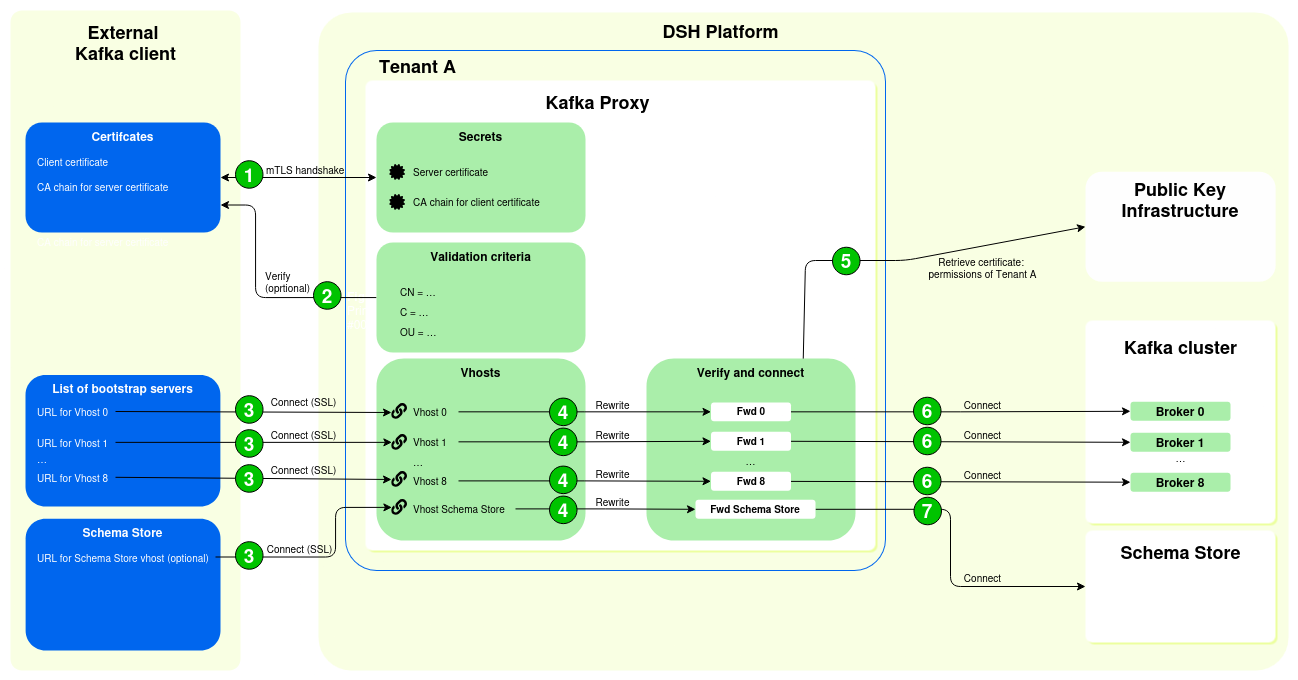
- The external Kafka client and the Kafka Proxy establish a secure connection using mTLS:
- The external Kafka client sends its client certificate to the Kafka Proxy. That way, the Kafka Proxy can verify the identity of the external Kafka client, using the CA chain for the client certificate.
- The Kafka Proxy sends its server certificate to the external Kafka client. That way, the external Kafka client can verify the identity of the Kafka Proxy, using the CA chain for the server certificate.
- Optionally, you can configure additional validation criteria that the Kafka Proxy needs to check before it accepts the client certificate. For example, you can impose limits on the country, locality, or organization in the client’s certificate.
- The external Kafka client connects to the Kafka Proxy:
- The external Kafka client is configured with a list of bootstrap servers, which point to vhosts assigned to the Kafka Proxy.
- These vhosts of the Kafka Proxy act as the starting point for the external Kafka client to discover the full set of active brokers.
- It’s recommended that the external Kafka client add 9 bootstrap servers to its configuration.
- The Kafka Proxy rewrites the request from the external Kafka client.
- The Kafka Proxy retrieves a separate certificate from the DSH’s Public Key Infrastructure (PKI) with the tenant’s permissions for the Kafka cluster:
- These permissions describe which right (“Read”, “Write”, “Read/Write”) the tenant has on a private Kafka topic (of type “scratch”), internal DSH stream, or public DSH stream.
- The external Kafka client receives the permissions as defined for the tenant.
- The Kafka Proxy forwards the connection to the correct broker in the Kafka cluster, using the separate certificate for the Kafka cluster. The Kafka cluster imposes the correct permissions, using the certificate that it receives from the Kafka Proxy.
- If the request from the Kafka Client involves a connection to the Schema Store, then the Kafka Proxy forwards the connection to the Schema Store, using the separate certificate for the Kafka cluster.
Warning
In this basic setup, the Kafka Proxy uses the permissions of the tenant:
- The external Kafka clients receives the same permissions for private Kafka topics of type “scratch” and for DSH streams as the tenant.
- If the tenant has “Read” and “Write” permissions for a Kafka topic, then the external client also receives “Read” and “Write” permissions for that Kafka topic.
Setup with ACL Groups
In the basic setup, the external Kafka client receives the same permissions as the tenant itself: the Kafka Proxy exposes all the DSH streams and private Kafka topics of type “scratch” that the tenant has access to, which is far from ideal. You can prevent this by creating ACL Groups.
In order to use ACL Groups, you need to do the following:
- Request a new limit for the ACL Groups. See Limits on the Kafka ACL Groups page for more information.
- Via the Tenant Managent API:
- Activate ACL Groups for the Kafka Proxy, via the
enableKafkaAclGroupskey in the configuration of the Kafka Proxy. - Create an ACL Group, which contains two arrays of Kafka topics and DSH streams: one that assigns “Read” permissions, and one that assigns “Write” permissions.
- Activate ACL Groups for the Kafka Proxy, via the
Note
Activating ACL Groups for your Kafka Proxy changes the format of the names of the consumer groups for that Kafka Proxy:
- More specifically, the DSH creates consumer group names for each ACL Group separately.
- If you activate ACL Groups for an existing Kafka Proxy, then you need to update the consumer group names that you use in the external Kafka clients.
- See Naming conventions for examples and the exact format.
Once these ACL Groups are available and you activated the mechanism, the high-level flow for connecting a Kafka client to the Kafka Proxy looks as follows:

- The external Kafka client and the Kafka Proxy establish a secure connection using mTLS:
- The external Kafka client sends its client certificate to the Kafka Proxy. That way, the Kafka Proxy can verify the identity of the external Kafka client, using the CA chain for the client certificate.
- The Kafka Proxy sends its server certificate to the external Kafka client. That way, the external Kafka client can verify the identity of the Kafka Proxy, using the CA chain for the server certificate.
- Optionally, you can configure additional validation criteria that the Kafka Proxy needs to check before it accepts the client certificate. For example, you can impose limits on the country, locality, or organization in the client’s certificate.
- The external Kafka client connects to the Kafka Proxy:
- The external Kafka client contains a list of bootstrap servers, which point to vhosts in the Kafka Proxy.
- These servers in the Kafka Proxy act as the starting point for the external Kafka client to discover the full set of active brokers.
- It’s recommended that the external Kafka client add 9 bootstrap servers to its configuration.
- The Kafka Proxy rewrites the request from the external Kafka client.
- The Kafka Proxy retrieves a separate certificate from the DSH’s PKI with the correct permissions for the Kafka cluster:
- The certificate of the external Kafka client needs to contain the ID of one ACL Group, in the key for the Organizational Unit (OU).
- The DSH applies the permissions of the ACL Group on top of the tenant’s permissions. In other words, it creates permissions based on the intersection between the permissions granted to the tenant, and the permissions granted in the ACL Group.
- These permissions describe which right (“Read”, “Write”, “Read/Write”) the external Kafka client has on a private Kafka topic (of type “scratch”), internal DSH stream, or public DSH stream.
- The Kafka Proxy forwards the connection to the correct broker in the Kafka cluster, using the separate certificate for the Kafka cluster. The Kafka cluster imposes the correct permissions, using the certificate that it receives from the Kafka Proxy.
- If the request from the Kafka Client involves a connection to the Schema Store, then the Kafka Proxy forwards the connection to the Schema Store, imposing permissions as defined in the certificate for the Kafka cluster.
This setup of the Kafka Proxy allows for a more fine-grained management of permissions, in which you can give an external Kafka client access to a subset of a tenant’s Kafka topics and DSH streams.
Warning
ACL Groups are very powerful, and it’s recommended to only use them if you’re aware of the consequences and risks:
- They can greatly improve the security of the Kafka Proxy and external Kafka clients.
- At the same time, the mechanism fails silently if you set it up incorrectly.
- Possible points of failure are the permissions in the ACL Group, the contents of the “OU” field in the client certificate, and the intersection of the tenant’s permissions and the permissions in the ACL Group.
Naming conventions
Setting up the Kafka Proxy involves a large number of namespaces for brokers and vhosts. The table below lists the format of these namespaces, where they are used, and an example with the following values:
platform-name: ‘staging’tenant-name: ‘tenant-a’proxy-name: ‘vehicle-proxy’ACL-group-name: ‘kafka-client-foo’
| Description | Example | |
|---|---|---|
| Common Name of Kafka Proxy |
Format: This is the server name that the server certificate protects. It corresponds to the name of your Kafka Proxy, and it appears as the Common Name (CN) of the server certificate. |
brokers.kafka.tenant-a.staging.kpn-dsh.com |
| Vhost for Kafka brokers |
Format: These are the names of the vhosts that correspond to brokers in the platform's Kafka cluster:
|
If the platform's Kafka cluster contains 3 brokers, then the DSH creates these 3 vhosts:
The following 9 vhosts appear in the SANs of the server certificate, and in the list of bootstrap servers in the configuration of the Kafka client:
|
| Names of consumer groups |
The names of consumer groups can have two formats:
|
If you don't use ACL Groups, then the DSH creates one global set of consumer group names for the Kafka Proxy:
If you do use ACL Groups, then the DSH creates a set of consumer group names per ACL Group:
|
| Vhost for Schema Store |
Format: This is the vhost for your tenant's Schema Store, if you choose to expose it via the Kafka Proxy. The vhost should appear as a SAN in the server certificate of your Kafka Proxy. |
vehicle-proxy-schema-store.kafka.tenant-a.staging.kpn-dsh.com |
Managing the Kafka Proxy
Certificates
In order to deploy the Kafka Proxy, you need to generate certificates and CA chains for the server and for the external Kafka client.
The server certificate of the Kafka Proxy should meet the following requirements:
- It’s strongly recommended to use an Organization Validated (OV) certificate or an Extended Validation (EV) certificate. See Certificates for more information.
- The Common Name (CN) field of the server certificate should have the format
brokers.kafka.<tenant-name>.<platform-name>.kpn-dsh.com. See Naming conventions for more information. - The server certificate should contain 9 SANs for the mirrorred Kafka brokers, in the format
<proxy-name>-<number>.<tenant-name>.<platform-name>.kpn-dsh.com. See Naming conventions for more information. - If you expose access to the Schema Store, then you need to include an additional SAN in the server certificate, in the format
<proxy-name>-schema-store.kafka.<tenant-name>.<platform-name>.kpn-dsh.com. See Naming conventions for more information. - Create a CA chain for your server certificate. A CA chain contains an ordered list of certificates, from the server certificate for your Kafka Proxy, via any intermediary certificates, up to the root CA certificate. The external Kafka client needs the CA chain in order to verify the server certificate of your Kafka Proxy.
Note
Don’t add a passphrase for your private key if you use the Kafka Proxy to expose your Schema Store. If you do add a passphrase for your private key, then the external Kafka client won’t have access to your Schema Store.
The client certificate of the Kafka Proxy should meet the following requirements:
- It’s strongly recommended to use an Organization Validated (OV) certificate or an Extended Validation (EV) certificate. See Certificates for more information.
- If you use ACL Groups to manage access to DSH streams and Kafka topics of type “scratch”, then the Organizational Unit (OU) field of the certificate should contain the ID of one ACL Group.
- If you use additional criteria to verify the client’s certificate, then you obviously need to make sure that the fields are present and correct in the client’s certificate.
- Create a CA chain for your client certificate. A CA chain contains an ordered list of certificates, from the client certificate, via any intermediary certificates, up to the root CA certificate. The Kafka Proxy needs the CA chain in order to verify the certificate of the external Kafka client.
- You need to add the CA chain for the client certificate to the DSH as a DSH secret. See Secrets for more information.
Creating a Kafka Proxy
Take the following steps to create a Kafka Proxy:
- Click “Services” in the menu bar of the DSH Console, and then click the “+ Kafka Proxy” button at the top of the “Services” page.
-
Fill out the following fields:
- Proxy name: Enter a name for your Kafka Proxy. The name must meet the following requirements:
- It must start with a lowercase letter (a–z).
- It can contain lowercase letters (a–z), numbers (0–9) , and hyphens (
-). - It can’t be longer than 60 characters.
- Make sure that this name matches the
<proxy-name>of the SANs in the server certificate. See Certificates and Naming conventions for more information.
- Instances: Enter the number of instances that the DSH should create for the Kafka Proxy.
- CPUs: Enter the number of CPU cores that the DSH should allocate to the Kafka Proxy. The default value is “0.5”.
- Memory: Enter the amount of memory, in megabytes (MB) that the DSH should allocate to the Kafka Proxy. The default value is “256”.
- Zone: In the dropdown list, select the correct DNS zone for the Kafka Proxy.
- CA chain secret: In the dropdown list, select the DSH secret that contains the CA chain for the certificate of the external Kafka client, or click the “+” button to create a new secret.
- Certifcate: In the dropdown list, select the DSH secret that contains the server certificate of the Kafka Proxy, or click the “+” button to create a new secret.
-
Client certificate subject expectations: Fill out additional criteria that the Kafka Proxy needs to check when it verifies the certificate of the external Kafka client:
- Click the “Add client certificate validation criteria” button to use a form for adding a new pattern. You can add more than one pattern by clicking the button multiple times.
- Click “Bulk entry items” to add criteria using a the JSON format. This way, you can enter more than one pattern at a time. Click the “Add from JSON” button to add your criteria to the Kafka Proxy.
- Click the “-” button to delete a criterion.
See Additional validation criteria to find out more about the logic behind the validation criteria.
-
Schema Store: Select this checkbox if you also want to expose your Schema Store to the external Kafka Client. If you do so, then you need to make sure that the private key of your server certificate doesn’t use a passphrase.
- Click the “Deploy Kafka Proxy” button.
- Proxy name: Enter a name for your Kafka Proxy. The name must meet the following requirements:
Inspecting the Kafka Proxy
You can inspect the Kafka Proxy just like any other service or application on the DSH. See Managing services and applications for more information and available actions.
Additional validation criteria
When an external Kafka client connects to the Kafka Proxy, then the Kafka Proxy verifies the client’s certificate against the CA chain. However, you can create additional criteria that the Kafka Proxy needs to check before accepting the client’s certificate. These criteria check the Distinguished Name (DN) of the certificate, which is the information in a certificate that identifies the owner of the certificate, and the certificate authority that issued the certificate.
You can add multiple criteria:
- If at least one of the criteria matches the DN, then the Kafka Proxy accepts the certificate.
- If none of the criteria matches the DN, then the Kafka Proxy rejects the certificate.
Available keys
The DN consists of multiple key-value pairs, and you can add criteria for the following keys:
- CN: Common Name
- C: Country Name
- L: Locality Name
- S: State or Province Name
- O: Organization Name
- OU: Organizational Unit
Note
- All the keys can have multiple values, except the “Common Name” key.
- If you use ACL Groups to determine the permissions of the external Kafka client, then the ID of the ACL Group is included in the value for the “Organizational Unit” key.
Exact matches
If you use an exact match pattern in the criterion, then you set the literal expected values for keys in the DN:
- Escape literal backslash (
\), comma (,), and square brackets ([and]) with a backslash. For example,a,b\,c,dsets three values: ‘a’, ‘b,c’ and ‘d’. - Leave the pattern empty to accept all values for a key.
- If you add a pattern with multiple values for a key, then take the following into account:
- Seperate the different values with a comma
,, and don’t add a whitespace after the comma. - You need to the enter the exact set of values that you want. The order of the values doesn’t matter.
- Seperate the different values with a comma
For example, the pattern C=NL,BE verifies the DNs below as follows:
-
C=NL ; C=BE: Accepted, because both “NL” and “BE” are part of the pattern. -
C=BE ; C=NL: Accepted, because both “NL” and “BE” are part of the pattern, and because the order of the values doesn’t matter. -
C=NL: Rejected, because “BE” is missing. -
C=NL ; C=BE ; C=DE: Rejected, because “DE” isn’t part of the pattern.
Regular expressions
You can use a regular expression in the criterion, using the RE2 syntax:
- The regular expressions are unanchored by default:
- As a consequence, they match all applicable substrings of the value.
- If you want to make sure that your regular expression matches the entire value of a subfield, anchor it. Prefix the regular expression with
^and suffix it with$.
- Escape literal backslash (
\), comma (,), and square brackets ([and]) with a backslash. For example:^a$,^b\,c$,^d$sets three regular expressions: ‘^a$’, ‘^b,c$’, and ‘^d$’.a\[bc\]dsets the regular expression ‘a[bc]d’.a\\\[bsets the regular expression ‘a\[b’.
- Leave the pattern empty to accept all values for a key.
- If you add a pattern with multiple values for a key, then take the following into account:
- Seperate the different values with a comma
,, and don’t add a whitespace after the comma. - For each key that has multiple values, you must set a regular expression for each of the expected values. The order of the values is important.
- Seperate the different values with a comma
For example, the pattern C=^NL$,^BE$ verifies the DNs below as follows:
-
C=NL ; C=BE: Accepted -
C=BE ; C=NL: Rejected, because order is important. “BE” doesn’t match^NL$, and “NL” doesn’t match^BE$. -
C=NL ; C=DE: Rejected, because the second regular expression doesn’t match the second value, even though the first regular expression matches the first value. -
C=NL: Rejected, because the second regular expression doesn’t have a corresponding value, even though the first regular expression matches the first value. -
C=NL ; C=BE ; C=DE: Rejected, because the third value doesn’t have a corresponding regular expression.
Kafka client requirements
You can use all regular Kafka clients to connect:
- The Kafka Proxy behaves like any normal Kafka broker.
- The Schema Store proxy behaves like a Confluent-compatible schema registry.
- Both the Kafka Proxy and the optional Schema Store proxy use the same TLS certificates for authentication.
Tip
See Clients on Apache Kafka’s Confluence for a list of Kafka clients.
Configure your Kafka client as follows:
- Bootstrap servers: Make sure that these follow the pattern
<proxy-name>-{0,1,2,…}.kafka.<tenant>.<platform-dns-name>:9091, and that you add all of the 9 bootstrap servers. - Schema Store server (optional): Make sure that it follows the pattern
<proxy-name>-schema-store.kafka.<tenant>.<platform-dns-name>:9091. See Naming conventions for more information. - Authentication: Use TLS client certificates. These certificates must be signed by the CA, see Architecture, Certificates, and Creating a Kafka Proxy for more information.